
所以在網路Google DIY CNC 找到了一款 OX CNC ,加工面積 可以1200X900mm 所以就買了材料組裝了一台。

操作軔體當然要支持 GRBL,自從1.1 版加入了許多功能,並加強了指令,更符合工業加工需求,也加速支援Arduino Mega2560 專案進行.相信未來.GRBL 如Marlin 會有更多人參與討論.

- Real-time Overrides : Alters the machine running state immediately with feed, rapid, spindle speed, spindle stop, and coolant toggle controls. This awesome new feature is common only on industrial machines, often used to optimize speeds and feeds while a job is running. Most hobby CNCs try to mimic this behavior, but usually have large amounts of lag. Grbl executes overrides in realtime and within tens of milliseconds.
- Jogging Mode : The new jogging commands are independent of the G-code parser, so that the parser state doesn't get altered and cause a potential crash if not restored properly. Documentation is included on how this works and how it can be used to control your machine via a joystick or rotary dial with a low-latency, satisfying response.
- Laser Mode : The new "laser" mode will cause Grbl to move continuously through consecutive G1, G2, and G3 commands with spindle speed changes. When "laser" mode is disabled, Grbl will instead come to a stop to ensure a spindle comes up to speed properly. Spindle speed overrides also work with laser mode so you can tweak the laser power, if you need to during the job. Switch between "laser" mode and "normal" mode via a $ setting.
- Dynamic Laser Power Scaling with Speed : If your machine has low accelerations, this option will automagically scale the laser power based on how fast Grbl is traveling, so you won't have burnt corners when your CNC has to make a turn! Enabled by the
M4spindle CCW command when laser mode is enabled. - Sleep Mode : Grbl may now be put to "sleep" via a $SLP command. This will disable everything, including the stepper drivers. Nice to have when you are leaving your machine unattended and want to power down everything automatically. Only a reset exits the sleep state.
- Significant Interface Improvements: Tweaked to increase overall performance, include lots more real-time data, and to simplify maintaining and writing GUIs. Based on direct feedback from multiple GUI developers and bench performance testing. NOTE: GUIs need to specifically update their code to be compatible with v1.1 and later.
- New Status Reports: To account for the additional override data, status reports have been tweaked to cram more data into it, while still being smaller than before. Documentation is included, outlining how it has been changed. Improved Error/Alarm Feedback : All Grbl error and alarm messages have been changed to providing a code. Each code is associated with a specific problem, so users will know exactly what is wrong without having to guess. Documentation and an easy to parse CSV is included in the repo.
- Extended-ASCII realtime commands : All overrides and future real-time commands are defined in the extended-ASCII character space. Unfortunately not easily type-able on a keyboard, but helps prevent accidental commands from a G-code file having these characters and gives lots of space for future expansion.
- Message Prefixes : Every message type from Grbl has a unique prefix to help GUIs immediately determine what the message is and parse it accordingly without having to know context. The prior interface had several instances of GUIs having to figure out the meaning of a message, which made everything more complicated than it needed to be. New OEM specific features, such as safety door parking, single configuration file build option, EEPROM restrictions and restoring controls, and storing product data information.
- New safety door parking motion as a compile-option. Grbl will retract, disable the spindle/coolant, and park near Z max. When resumed, it will perform these tasks in reverse order and continue the program. Highly configurable, even to add more than one parking motion. See config.h for details.
- New '$' Grbl settings for max and min spindle rpm. Allows for tweaking the PWM output to more closely match true spindle rpm. When max rpm is set to zero or less than min rpm, the PWM pin D11 will act like a simple enable on/off output.
- Updated G28 and G30 behavior from NIST to LinuxCNC G-code description. In short, if an intermediate motion is specified, only the axes specified will move to the stored coordinates, not all axes as before.
- Lots of minor bug fixes and refactoring to make the code more efficient and flexible.
- NOTE: Arduino Mega2560 support has been moved to an active, official Grbl-Mega project. All new developments here and there will be synced when it makes sense to.
GRBL 中的 Arduino CNC Shield V3.00 ,因為在 GRBL 0.9h 修改Pin 腳, 所以都要進行跳線才能對應相對功能,而網路所販售的Arduino CNC Shield V3.00,卻未能更正.

原來是 CNC Shield 的設計者不滿大陸拿著CNC Shield 的設計圖稿大量生產.而未告知設計者..引起設計者不滿..在3.0版後就不再提供 CNC Sheiled 圖稿.所以大陸就沒有新圖稿可以生產3.1.....,如果有需要3.1版的可以跟 CNC Shield 的設計者購買不然就自己設計..,而 GRBL 對
Arduino腳位有公開定義.不然怎麼可以叫OPEN SOURCE..
所以 Open mind start with yourself.
從 GRBL Pin Layout 可以自看到

GRBL 原本 Pin 腳定義

GRBL 新 Pin 腳定義
從上二張圖,可以看出新Layout 的就是12腳定義為Variable Spindle PWM,而原本的12腳Limit Z-Axis 移到13腳,而原本的13腳Spindle Enable 取消。
知道新版的GRBL Pin Layout,就可以自由設計自己的CNC Shield Layout.
找一個開源的PCB Layout 軟體.支援Arduino.google 看到KiCad 是不錯的選擇..
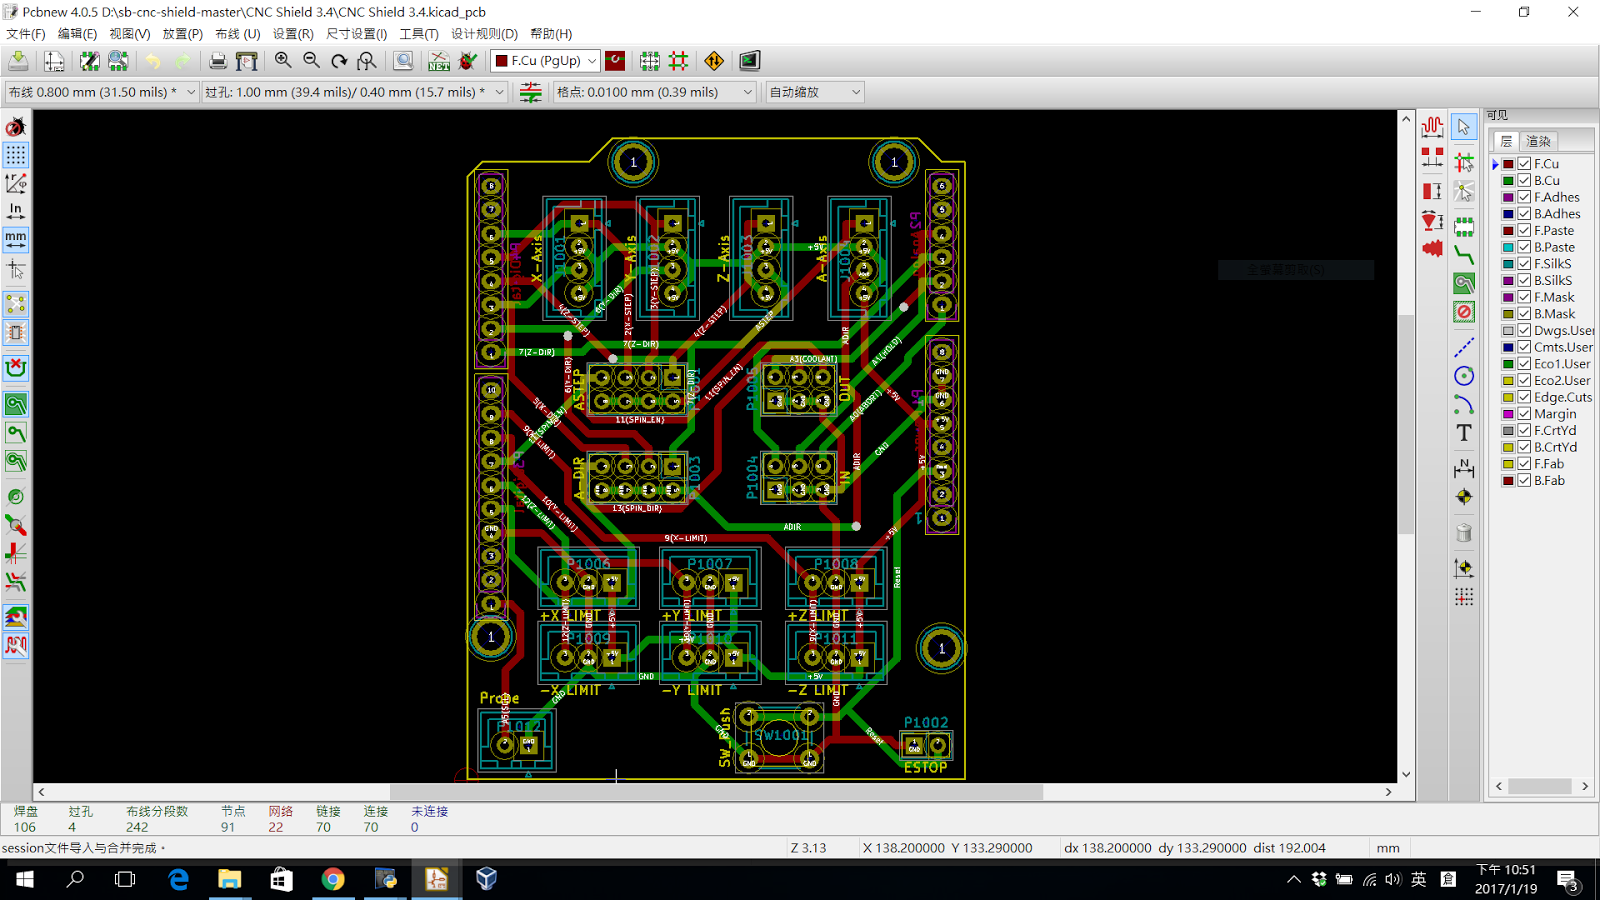
繪製一下Arduino CNC Layout .

定義一下元件,排列一下 PCB 上的元件.

利用外掛FreeRoute 自動規劃一下線路.

就完成了Arduino CNC Layout .
最後再看一下3D Layout,看是不是符合自己的規劃!

最後儲存Gerber檔案..就可以交給PCB廠進行打樣.就完成了~~

完成~~唉~~不是要用Cyclone PCB 打樣嗎>.<~~
對喔~~
為何叫pcb2gcode 為程式~~不叫軟體~~因為他是程式指令..你必備在命令提示字元(就是所謂的DOS模式)輸入一大串字..>.<
如下:
pcb2gcode.exe--back="D:/e2d-cnc-shield-master/CNC Shield 3.4/Gerber/CNC Shield 3.4-B.Cu.gbr" --drill="D:/e2d-cnc-shield-master/CNC Shield 3.4/Gerber/CNC Shield 3.4.drl" --front="D:/e2d-cnc-shield-master/CNC Shield 3.4/Gerber/CNC Shield 3.4-F.Cu.gbr" --outline="D:/e2d-cnc-shield-master/CNC Shield 3.4/Gerber/CNC Shield 3.4-Edge.Cuts.gbr" --output-dir="D:/e2d-cnc-shield-master/CNC Shield 3.4/Gerber/NC" --metric=true --metricoutput=true --mirror-absolute=false --nog64=true --optimise=true --tile-x=1 --tile-y=1 --tolerance=0.0100 --vectorial=true --zchange=10.0000 --zero-start=true --zsafe=5.0000 --extra-passes=0 --mill-feed=75 --mill-speed=3000 --offset=0.1000 --voronoi=false --zwork=-0.0500 --drill-feed=100 --drill-side=front --drill-speed=2000 --milldrill=false --nog81=true --nog91-1=true --onedrill=false --zdrill=-2.5000 --bridges=2.0000 --bridgesnum=4 --cut-feed=30 --cut-infeed=10.0000 --cut-side=auto --cut-speed=3000 --cutter-diameter=1.2000 --fill-outline=true --outline-width=0.2000 --zbridges=-0.6000 --zcut=-2.5000
頭都暈了~~還好作者有做視窗介面 pcb2gcodeGUI 你就可以像我滑鼠點一點..就可以轉換成 G-code .

接下來就是要搬出..Cyclone~~

首先要將PCB固定在加工平台上 ~~廢話!!~~
可是要在PCB四周上鑽上四個小孔 ~~Why??~
重點來了 為了要上下或左右 翻面用~~

再來就是要先鑽出 通孔Via .. 因為GRBL 0.9h 就開始支援主軸馬達轉速指令~~

而bCNC 也更新軟體介面來操作.支援 GRBL 1.1 調整進料率及變更主軸轉速率.或降速率。

接著雕刻正面Layout.


接下來就要將PCB 翻面..這時候就要靠一開始的四周的四個小孔來定位PCB,來確保PCB上下或左右保持PCB 水平或垂直..我會在PCB 插上大頭針確保鎖上PCB時不會位移..

將主軸回到原本設定的工作原點,再打開之前Via 鑽孔檔。
再利用bCNC 水平翻轉功能進行,設定工作原點..(因為我是左右翻..所以向左移)

左移主軸確認中心,位移到PCB 原本鑽出的定位孔

按下X=0,設定X軸歸零。

這時就看到整個加工孔位向右位移。你可以挑幾個孔位進行確認~~
如果這是有影像定位就不用這麼麻煩了。


同樣在行雕刻行先行水平校正。

接著雕刻反面Layout.


完成後就可以用玉米銑刀,切下外框。


pcb2gcode 可以設定連接帶,可以看到四周連接點.避免銑切時造成損傷.。


用斜口鉗剪下四周連接帶,就可輕易取下,雕刻並鑽好孔的雙層電路板 .

是通孔,因為上下層是靠著鑽孔處來上下導通電路;而焊接時只能單一側焊接,就會造成斷路~~,所以要焊接前要先通水管~~就要買通樂。︿。 如果要通孔,介紹你"導電銀膠 " 保證不通。上膠後馬上通~。不過不可以上太多。不然就會淹水,一淹水就短路了~ 真麻煩。所以並不是有孔就要通。最後再用三用電表檢查一下,確認該通的要通,不該通的就要清一清 。不然一焊接,就找不到那裡有通那裡不通囉~。

2 則留言:
感謝您的分享,請問您組裝的是這款嗎?
看起來有不小的差異。
http://www.openbuilds.com/builds/openbuilds-ox-cnc-machine.341/
你誤會了~~XO CNC 是我的新玩具(尚在摸索中..)
我是用Cyclone PCB 來雕刻OX 的GRBL 電路
我之前組的是 Cyclone PCB 請參閱
http://engineer2designer.blogspot.com/2016/08/3d-cnc.html
OX CNC 還要等一會~~
張貼留言